So here is how we did ours. I had to redo my ball....I thought maybe I should just stick to sewing but I hung in there.
 You need
styro foam ball
applique pins 3/4 inch
fabric cut in 2 1/2 inch squares (a Go cutter would come in handy for this)
ribbon and glue.
 You fold in half. I ironed mine. I didn't the first one and well, if you iron it seems you have more control over your fabric. The gal who was teaching did not iron and hers turned out beautifully.
 fold in half again
 open up and then fold both sides to the middle
 open up, find the middle.
 If you want to hide you pin, you put the pin on the inside at the center point. If not, just pin on the outside.
 You have to find your center point on both sides. She just put a regular pin on both sides and tried to eyeball the center. I did that at first and was sooooo off (one reason I had to start over). So when everyone left. I got out my measuring tape and found the circumference and went from there....worked out a lot better. So now that you have found the middle, you place the pinned fabric there. Now the gal that was showing us glued hers down.
 This is what it looks like with all triangles in the middle. I placed pins at the bottom of the triangle just to keep the bottom of the triangle under control. Now when you go to put on your second row, you will take out the bottom pins because the next row will be overlapping and then just pin down the next rows bottom....easy...
 You do the top and then the bottom, then add the second row, top, bottom, then last row. Oh...I almost forgot, I measured from the center to the tip of the next triangle on each one. The first ball, she said to just eyeball it...I did but for some reason it just looked bad bad bad. So measure I did, I am not ashamed....
 Here is all three rows done.
 This is what it looks like when it meets...yes...a mess but at least they meet.
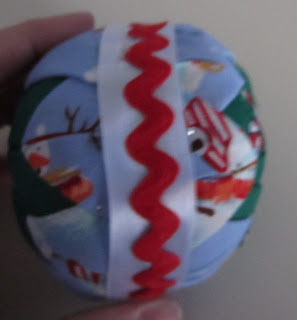
 Here it is all cleaned up with a ribbon around it.
 How about some rick rack?
 There you have it....

 You fold in half. I ironed mine. I didn't the first one and well, if you iron it seems you have more control over your fabric. The gal who was teaching did not iron and hers turned out beautifully.
 fold in half again
 open up and then fold both sides to the middle
 open up, find the middle.
 If you want to hide you pin, you put the pin on the inside at the center point. If not, just pin on the outside.
 You have to find your center point on both sides. She just put a regular pin on both sides and tried to eyeball the center. I did that at first and was sooooo off (one reason I had to start over). So when everyone left. I got out my measuring tape and found the circumference and went from there....worked out a lot better. So now that you have found the middle, you place the pinned fabric there. Now the gal that was showing us glued hers down.
 This is what it looks like with all triangles in the middle. I placed pins at the bottom of the triangle just to keep the bottom of the triangle under control. Now when you go to put on your second row, you will take out the bottom pins because the next row will be overlapping and then just pin down the next rows bottom....easy...
 You do the top and then the bottom, then add the second row, top, bottom, then last row. Oh...I almost forgot, I measured from the center to the tip of the next triangle on each one. The first ball, she said to just eyeball it...I did but for some reason it just looked bad bad bad. So measure I did, I am not ashamed....
 Here is all three rows done.
 This is what it looks like when it meets...yes...a mess but at least they meet.
 Here it is all cleaned up with a ribbon around it.
 How about some rick rack?
 There you have it....
32 comments:
very nice, I've seen these before and want to try them, I've seen with a small square piece of fabric on the ball first then the triangle unit, maybe so if there's a gap, you can't see the ball? not sure why else it would be there.
Oh my! These bring back memories! I used to makes these for Christmas ornaments when I was a teenager. :-)
Thanks for the wonderful tutorial!! I'll be saving this to try after the holidays.
Barb glad you hung in there...just love it...wish i was there learning how to do them
Looks great, Barb! ;-)
Beautiful Barb..I tried making those several times before and never had the patience. Great job.
Cute! I've always wondered how these were made. Thanks!
Looks so cool Barb.
Congratulations for the beautiful work, Barbara. I pretty much do as well. good week
http://tearpiaocupacional.blogspot.com/
Thank you!
Hi Barb, I have always wanted to make these but I think I need someone right beside me moving my hands so I can catch on. Really I find anymore sometimes just reading instructions isn't enough. Anyway really cute maybe I will attempt one if I have time. Blessings.
Very cute! I'd not seen those, don't think I'd have the patience but the end result is cool :)
Very fun!! I've made these too and just love the outcome. :-) Have a happy week!
The girls are going to have fun with this.
Love that ball. Thanks for the tutorial. I'll have to show it to my daughter. I bet she'd like to do something like this.
Those are so cute!
Great tutorial. Are you going to have your Young Woman group make these? Seems like a great non-sewing project for them.
SewCalGal
www.sewcalgal.blogspot.com
I've never seen those before, but they are really cute! Good job, Barb. Nothing wrong with measuring, either. You know what "Norm" from "This Old House" always says...'measure twice, cut once." :o)
XOXO,
Cyndi
Oh wow now that is pretty amazing...I can do this...you made it look too easy...thanks sweetie
hahaha!! is there nothing you won't tackle??
Cute, Barb. I remember doing those in the past.
Great tutorial Barb. I did these a few years ago and loved doing them. I'll have to make a few more for this year now that you've reminded me about them...These were fun and turn out so cute too. I know your young women will enjoy these.
Oh, my goodness. That is SO cute! I'm going to have to try those. I'll let you know how they come out ;).
xo -E
That is so neat!!!
I've always wanted to make one of these. Thanks for the tutorial. Your little quilts are great, too.
I too always wanted to know how to make one of these, yours is gorgeous. Thanks for the great tute. xo
You are so brave to try this. I made an acorn one using ribbon on an egg shaped styrofoam ball. I had the hardest time folding the ribbon and dealing with the tiny pins lol.
Your ball turned out wonderful! I love the fabric you chose.
Excellent tutorial and photos. I think I'll try this technique. Thanks for sharing Barb.
I love these; thanx for sharing the how to :)
I've often wondered how these were made. You've put together a great tut on them.
I love this tutorial!!!
Hi
This are brilliant. Is it possible to make them using a bigger ball? I have a 12cm one that I would like to use do you know what size fabric squares I would have to cut?
Thanks
Post a Comment